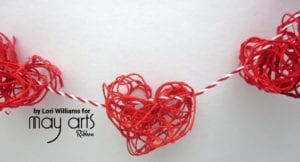
Fun DIY: Valentine’s Day Garland
This is a project that I just kept having ideas of how you could alter it as the possibilities are endless with this Valentine’s Day Garland. This is super cute with the three dimensional hearts…but what if you added some glitter to the finished project , used different sizes of cord or even had some lighter ribbon woven through the finished hearts…really you can just go on and on with the fun this projects it could become. I’ll show you how to step by step create the base and then…let your imagination go and see what you come up with. I see some really cool shapes for other holidays too…hum…..so many possibilities.
Step 1: Fold tin foil down into a long strip that is about an 1 to 1 ¼” in height.
Step 2: Form your strips into heart shapes
Step 3: You’ll want to create as many hearts as you want on your garland. I created five for my mini banner.
Step 4: Next take a ½ cup of flour, ½ cup of water and a couple tablespoons of red acrylic paint and mix together to form a paste.
Step 5: Get your May Arts/Ribbon Resource twine and cut into 2 foot lengths. You’ll use 3-4 and on each heart. Don’t make your string to long or it will get tangled when you put it in the mixture. Don’t ask me how I know this, LOL.
Step 6: Dunk the strings sections into the paste and then pull up between your fingers getting off the excess mixture. You want the twine to be soaked but not dripping with the mix.
Step 7: Line a baking sheet with foil and then place your molds on top. Place the string down in each mold. You can make it as dense or light as you want just be sure you have the string all in the mold so you will be able to tell the shape when it’s dry.
Step 8: Bake the hearts in the oven at 200 degrees for one hour. Turn off the oven and turn each of the hearts then let it stay in the turned off, but warm oven for another hour. This is going to set them.
Step 9. Cut the molds with scissors and then peel away to reveal the three dimensional hearts.
Step 10: Here is how one of your set hearts will look.
Step 11: Now it’s time to string the garland up. Choose your favorite Ribbon Resource/May Arts Valentine ribbon and weave through the hearts so they will hang as you want and then decorate for the season of love.
Ribbon Used:
Other Supplies:
- Tin Foil
- Flour
- Water
- Red Paint
- Scissors
- Oven


